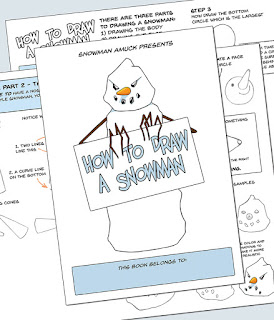
Snowman Amuck presents: How to Draw a Snowman. Create your own unique snowman and learn a few drawing tricks along the way. Printable as sheets or booklet.
Get How to Draw a Snowman pdf that prints as sheets
If you are handy with two-sided printing, try the booklet format (you'll save paper too).
Get How to Draw a Snowman pdf that prints as booklet
Instructions for printing booklet
Thursday, September 30, 2021
Monday, September 27, 2021
Snowman Amuck Paperdolls
Snowman Amuck paper dolls figures and outfits. Full color, printable pdf file that you can download and print:
Snowman Amuck Paper Dolls
Snowman Amuck Paper Dolls
New for Fall!
Add 4 brand new Halloween costumes to your Snowman Amuck paperdoll collection:
Monday, August 9, 2021
Snowman Poop Printable Label
At last, the official Snowman Amuck "Snowman Poop" printable label.
Give your kids a laugh with this easy craft project. They can share the fun with friends and family. For an extra special gift pair "Snowman Poop" with a canister of hot chocolate mix, Christmas mugs or even a print copy of Snowman Amuck
Download and print label here: PDF of Snowman Poop Label
What You Need
Snowman Amuck "Snowman Poop" label
plastic sandwich bags (6 1/2 inches wide)
mini marshmallows
scissors
standard stapler
Instructions
2) Cut out the label and fold in half along the center white line.
 |
| Cut out label and fold along the center white line. |
3) Put approximately 1 1/2 cups of mini marshmallows into the sandwich bag.
4) Next, place the top 2 inches of the sandwich bag between the label as pictured below.
5) For the last step, staple the bag in place. Two staples should be enough. Be sure to staple all the way through.
And there you have it - the official Snowman Amuck "Snowman Poop."
Saturday, August 8, 2020
Snowman Amuck Coloring Pages
 |
coloring page 1
coloring page 2
coloring page 3
Sunday, September 1, 2019
Melted Snowman with Homemade Puffy Paint
Summer is not really the season for making snowmen, but it is the perfect season for melted snowmen. Make your own melted snowman with homemade puffy paint. It's easy to make, fun to use, and dries puffy.
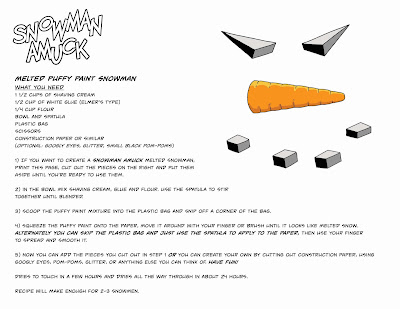
I've also created a new printable activity page so you can create a Snowman Amuck melted snowman. Click here to download and print activity page
Give it a try, use your imagination and have fun!
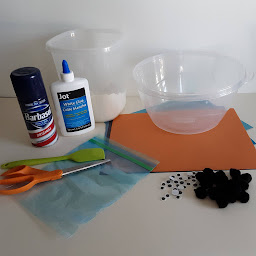
What You Need
1 1/2 cups of shaving cream
1/2 cup of white glue (Elmer’s type)
1/4 cup flour
bowl and spatula
plastic bag
scissors
construction paper or similar
(optional: printed activity page, googly eyes, glitter, small black pom-poms)
Instructions
1) If you want to create a Snowman Amuck melted snowman, print out the activity page and cut out the pieces for the eyes, nose and mouth on the right side of the sheet. Put them aside until you’re ready to use them.
2) In the bowl mix shaving cream, glue and flour. Use the spatula to stir together until blended.
 |
| Stir shaving cream, glue, and flour together until blended. |
3) Scoop the puffy paint mixture into the plastic bag and snip off a corner of the bag.
4) Squeeze the puffy paint onto the paper, move it around with your finger or brush until it looks like melted snow. Alternately you can skip the plastic bag and just use the spatula to apply to the paper, then use your finger to spread and smooth it.
 |
| Squeeze the puffy paint onto the paper. Use a brush or your finger to move it around. |
5) Now you can add the pieces you cut out from the activity sheet in step 1 or you can create your own by cutting out construction paper, using googly eyes, pom-poms, glitter, or anything else you can think of.
 |
| While puffy paint is wet, add eyes, nose, and any other details. |
As you can see in the example below, the puffy paint will smooth out as it dries and look even more like melted snow.
 |
| Puffy paint will smooth out as it dries. |
Paint will dry to the touch in a few hours and dries all the way through in about 24 hours. Recipe will make 2-3 snowmen.
And don't forget to download the Melted Puffy Paint Snowman activity sheet. It includes the recipe and directions for making puffy paint: Download Activity Sheet
Friday, August 7, 2015
Get Your Book Signed and Learn How to Send a Self-Addressed Stamped Envelope
Did you buy your book online? Or miss a signing event? Here's how to get your book signed...
Send a self-addressed stamped envelope to
Cindy Samul
c/o Key Art Books
PO Box 129
New London CT 06320
We'll send you a bookplate* personalized and signed by Snowman Amuck author and illustrator Cindy Samul (she might even do a little sketch for you).
*The author of this post does not know why a bookplate is called a a bookplate. It is neither a book nor a plate. It is, apparently, "a decorative label stuck in the front of a book, bearing the name of the book's owner."
How to send a self-addressed stamped envelope
What you need:
-1 small piece of paper
-1 pen
-2 envelopes
-2 stamps
Step 1: Take the first envelope and print your correct name and correct address on it. Do not seal this envelope.
Step 2: Put a stamp on it.
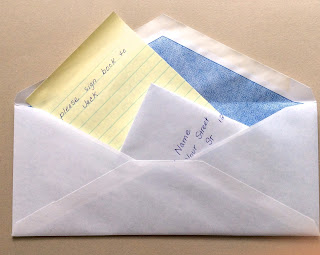
Step 3: Fold the envelope in thirds as pictured here:
Step 4: On the piece of paper write the name (or names) of the person you would like the book signed to.
Step 5: Put the piece of paper and the folded envelope into the second envelope.
Step 6: Seal this envelope.
Step 7: Write the following address on the front:
Cindy Samul
c/o Key Art Books
PO Box 129
New London CT 06320
Be sure to write your own address in the upper left hand corner as pictured here:
Step 8: Put a stamp on it.
Step 9: Put the envelope in the mail.
Step 10: Wait.
Step 11: Receive your official Snowman Amuck bookplate, personalized and signed to you.


